Monday, October 31, 2011

Wishing You More Treats Than Tricks!!!!!


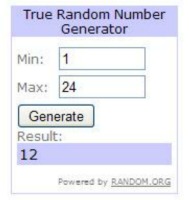
Time to announce the winner of the candy from the blog hop last week.  I've used random.org to choose the winner.

Drum roll please...............................and the winner is..............
Congrats Dana!  I've emailed you for your address.

Now on to a Halloween Treat Bag.

These treat bags were made to send to some of my son's cousins.  The bat was cut from Hello Kitty Greetings.  I used colored pencils to shade his ears and belly.  Since these are going to small children, I didn't even attempt to shade well.  I then used Viva Decor Pearl Pens to make the eyes and nose.
On a side note:  I love these pens over Stickles b/c they come in solid colors, dry WAAAAAY faster, and end up just as three-dimensional as they look when wet.
Finally I used a white Uniball pen to make his fangs.

The trim at the top is just a strip of black paper that has been punched with Martha Stewart Iron Gate Punch Around The Page.  I layered it overtop white paper to make the detail stand out a bit.  Then I used some super cute batty paper.

Thursday, October 27, 2011

Time For A Halloween Blog Hop Boys and Ghouls!


Welcome to our frighteningly awesome Halloween blog hop.  If you've gotten here from Lori @ Got 2 B Crafting, then you're in the right spot and you're almost done!

As my mind swirls with each day's tasks, chores to be done, and appointments to keep, I don't see it happen often where crafting ideas are as plentiful as the fall leaves on the ground.  But for some reason Halloween really gets me motivated.  I think it's because to me it marks the beginning of the "holiday season".  Yeah, I'm one of those people that starts getting excited for Christmas three months in advance.  (Though I think one of the biggest reasons I am that way is the fact that I need that much time to finish Christmas cards.)  So when I started thinking of creations for this blog hop, I had several different options.  The first was a cute wreath with bats and witches and jack-o-lanterns.  Next came a concept for a sweet as can be banner using candy corn as the base (it's my favorite candy this time of year).  But here's what I ended up with-------a lamp shade!  While zipping through Target trying to get the creative juices going----I spotted a pure white lamp shade for around $10.  It's something that I figured most people already had lying around their house and could easily decorate for each season.  So starts my ritual of decorating my lamp shade for each holiday!

Cricut Cuts From Holiday Cakes:
Haunted House - Cut at 5.8" tall
Moon (circle)  - Cut at 5.25" 

Cricut Cut From Bloom:
Bare Tree - Cut at 4" tall

Cricut Cut From Mini Monsters:
Spider Web (two welded together) - Cut at 2.5" tall

Cricut Cuts From Happy Hauntings:
Witch - Cut at 2" tall
Ghosts - Cut at 2.5" and 1.65" tall

All of the images were cut and then adhered to a clear acetate sheet.  HINT:  use the cover to your old non-sticky Cricut mat!  The sheet was then attached to the shade by punching four small holes in the corners and using large brads to hold it in place.


YOU ARE HERE-Crystal @ Creations By Crystal
THE FINAL STOP-Sis @ Paper, Craft, and Scissors
And as a little treat for stopping by today, I will be giving away the Winter Lace cartridge to one lucky person.  Just follow my blog and leave a comment on this post.  I will choose the winner using random.org on Sunday.
Wishing you a Spooktacular Halloween!

I will be using this in the following challenges:
Cricut Blog - Halloween Home Decor

Wednesday, October 26, 2011

A "Fairy" Beautiful Triple Layered Easel Card

I don't know that I've ever actually stated that one of my cards is my "favorite", but I will go out on a limb and claim that this one is!!!!  It's my first attempt at a triple layered easel card (or any type of easel card for that matter), and it turned out fantastic!
We'll work back to front for this card.

For the back layer I used some Grand Nestabilities Scallop Circles.  I didn't want to have too much empty space at the top of the card, so I made sure to use the larger circles and trim the bottoms to fit.  It's not necessarily pretty this way, but it isn't seen when the card is standing up.  The leaves and branch are cut using my Cricut and then shading was done with Copic markers.  I also paper pieced three of the flowers and popped them up with dimensional foam.
The middle layer has a lot more detail to it.  The strawberry was cut using my Cricut, blinged up with Stickles, and layered on top of a pinwheel I made out of fabric.  Then to the right is my sweet little sitting fairy.  I'll have to do some googling to find who makes the stamp because I can't for the life of me remember.  Maybe someday I'll be one of those über organized individuals that stores everything by vendor, but for right now I'm lucky if I can even remember how to get to my scrapping room.  Finally I added a little more pizazz with some beads I found in the floral department.  A little TIP:  I bought these beads in white and use my Copics to color them to match the project I'm working on.

Finally we get to the smallest bottom layer.  The ribbon was sewn onto the base to act as a stopper/prop.  The cute label on this layer was also cut with my Cricut and then stamped with a Stampin Up verse.
I still find it very difficult to mail out many of the cards I make.  As I'm branching out into different embellisments, the cards just keep getting bigger and bulkier.  Luckily this type of card folds down quite nicely in order to fit in an envelope.

Friday, October 7, 2011

TGIF People!!!!!!!!

Wow---what a week!  I am so thankful that it's Friday today and that I only need to stay at work for five hours in order to get my full 40 for the week.  Hopefully I'll find time to go home and craft or nap instead of doing dishes or laundry.


Today I'm posting a card for the challenge over at TGF Farm Fresh Challenge Blog.  The challenge is to use a scallop somewhere on your card.  I decided to turn the whole thing into a big scallop.  I used my Gypsy to weld two scallop circles together and create the card base.

This little guy was colored with the following Copic markers:
Shirt:  YG63, YG67
Pants:  B21, B23, B26
Hair:  E13, E15, E17, E18

This is by far one of my favorite lines of stamps.  All of the characters are so cute and fun to color up.  This image is Oh Boy! Ian and is perfect for my birthday card to a little boy.

Thursday, October 6, 2011

Already Time For Christmas?


Every year I wonder why fall spends less and less time on our calendar.  It seems like it arrives on a Thursday and winter starts the following Saturday.  I suppose part of that could be the fact that it's only October 6th and I'm already posting a Christmas card.  Now normally I am not the type of gal to be early (pretty much for anything).  But this year I MUST get Christmas cards out in a timely fashion.  In years past I have most certainly not been the crafter that creates 200 stunningly ornate Christmas cards and drops them lovingly in the mail by December 1st.  It's typically December 15th that I decide I should start to make my cards.  Then when the 20th rolls around, I give in and buy a couple of boxes from Target.

This year I have been inspired by My Pink Stamper to get my holly jolly on early!  She has asked everyone to join in on her Christmas Card Challenge.  With any luck I'll be a big winner and get my first set of her Christmas stamps.
 
I created this card with a Penny Black Stamp and some simple sewing around the edges.  The holly is from the Cricut cartridge Christmas Cheer.

Wednesday, October 5, 2011

October is Breast Cancer Awareness Month

For more than 20 years, the observance of National Breast Cancer Awareness Month each October has provided a time to reflect on loved ones who have won and lost the battle against breast cancer. It's also an opportunity to raise awareness toward finding a cure, including encouraging women to get a regular mammography screening.

A very good friend of mine (and probably the funniest woman I know) found out on the 13th of September that she has breast cancer.  She is scheduled for a double mastectomy on Thursday.  Instead of being sad and dwelling on the negative----she has decided to be optimistic and celebrate her strength to fight this battle.  I made this card for her and hope she knows I keep her in my thoughts constantly.

Image is by Kenny K
Flourish is Sizzix Swirl
Copics Used:
BG11, 34, 45, 49, 09
V12, 17, 09
E00, 31, 34

I will be entering this card into the following challenge:
Paper Makeup Stamps Blog - Digi Makeover Challenge 5 (A Color Challenge)