Tuesday, August 31, 2010
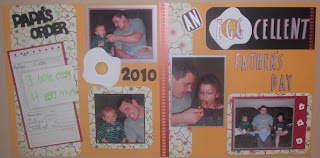
An Eggcellent Father's Day
Here's a layout of the kiddies and Tim on Father's Day. This page has the actual note Kaitlyn wrote for Papa's breakfast. Sometimes it's the simple things in life that really make it all worthwhile.
A Friendly Hello!
I created this card today for the Monday Challenge on the Scrapmaster's blog. The challenge was to use the following colors: Pacific Point Blue, Pear Pizzazz, and Rich Razzleberry. The photo shows the green I used as a bit darker than it actually is in real life. But the card turned out awesome.
Here's the recipe:
Flower in pot: Just Because Cards (cut at 4") --- "Skittles" were used in the center of each flower.
Hello: Cuttin Up
Girl: Rain, Snow, Shine Stamp from The Greeting Farm (colored with Copics)
Here's the recipe:
Flower in pot: Just Because Cards (cut at 4") --- "Skittles" were used in the center of each flower.
Hello: Cuttin Up
Girl: Rain, Snow, Shine Stamp from The Greeting Farm (colored with Copics)
Thursday, August 26, 2010
Welcome To The Pack!!!
At work we've had a few new people start in the last couple of weeks. I got the great idea to welcome them to "our pack" by making some tasty treats. So I made enough of these bags of puppy chow to give everyone in our office.
Puppy Chow Recipe
Ingredients:1/2 cup peanut butter
1/4 cup butter
1 cup chocolate chips
1/2 teaspoon vanilla
9 cups Crispix cereal (any flavor)
1-1/2 cups powdered sugar
Instructions:1. Combine peanut butter, butter and chocolate chips in a microwave safe bowl.
2. Microwave for one minute then stir to blend all ingredients thoroughly. Add 1/2 tsp. vanilla. Stir well.
3. Place the 9 cups of Crispix cereal in a very large bowl.
4. Pour the peanut butter-chocolate mixture over the cereal and toss evenly, making sure all the cereal gets a good covering.
5. Coat with powdered sugar, sprinkling evenly over the cereal and tossing as you sprinkle to cover each piece well.
Treat Bag RecipeFor the tag at the top of the bags, I used Animal Kingdom for the dog and Calligraphy for the writing. I used Amy Chomas' pen holders with the smaller tipped Sharpie markers. Finally I used the Martha Stewart Gothic Arches punch at the bottom of the tag.
Tuesday, August 24, 2010
Monday's Cricut Circle Challenge
It seems like I'm working on these projects as the clock strikes midnight. But I'm still posting it anyway!!! Monday's challenge required using the colors blue, pink, and yellow. I used these three colors in a cute card for a friend.
The stamp of the girl is from The Greeting Farm, Rain Snow Shine stamp set.
The stamp of the girl is from The Greeting Farm, Rain Snow Shine stamp set.
A Fun Layout of the Kids at the Petting Zoo
Monday, August 23, 2010
CHA 2010 / Cricut Imagine
So this was the first time I have been able to go to CHA. And I will say for the record.....that it was SO worth it! I was able to get so many new ideas and try out some very exciting new products.
Perhaps the biggest and most exciting news was in regards to the Cricut Imagine by ProvoCraft. Here are your top ten questions answered.
1. What is the difference between the Cricut personal cutters that are out in the market now and the new Imagine that will be available through HSN on Sept 14th?
A. The current Cricut machines require colored/pattern cardstock to be purchased and run through the machine so that shapes can be cut out. The new Imagine only needs white cardstock and can create virtually any color/pattern by printing on the paper and then cutting the shape out. This machine can also be used as JUST a printer or JUST a cutter. Keep in mind that the Imagine does not link up to a desktop or laptop computer. So you will not be able to print out Word/Xcel documents---only the shapes included in the Cricut and Imagine cartridges.
2. Will my current Cricut cartridges work with the new Imagine?
A. Yes----all current cartridges will work. On top of that----all of your cartridges will have a limitless number of new possibilities when you add one of the new pattern cartridges to the machine as well.
3. How much will this new machine cost?
A. The suggested retail price is $599.99 but you can already find this item on preorder at websites such as scrapbookpal.com for $489.99.
4. How much does the ink cost?
A. The special Cricut ink will need to be purchased for this machine despite the fact that it's a HP product. The ink will be available at any retailer where the Imagine will be sold. The suggested price is $34.99 for the black ink and $39.99 for the multi-color ink.
5. How much can I really print with this machine?
A. They are estimating that you can print 80 full background sheets with one black and one color ink cartridge. If you're printing only shapes/images, you can get an estimated 120 12x12 sheets. That equates to approximately .97 per page for a full background sheet or .63 for a full page of other cuts/shapes.
6. Will the Gypsy, Design Studio, and Jukebox work with this?
A. Gypsy and Jukebox will work with the new Imagine at launch in Sept. ProvoCraft is currently working on an upgrade to the Design Studio software that will make that program compatible as well.
7. What's the print quality like.....honestly?
A. This was perhaps my biggest question. And to be 100% honest, the quality is ten times better than what I thought it would be. These pieces are VERY comparible to any store-bought die-cut you can find. I would give it a 9.8 out of 10! (And I'm picky!)
8. Do I need to purchase special paper?
A. No, any standard cardstock/paper that's on the market will work in this machine. You can actually use any medium that you're able to run through a standard printer. Since the mat is slightly curved while running through the machine, chip board cannot be used.
9. Does this machine cut individual layers for each image or does it add all layers together to make one piece?
A. Each image can be cut either as one piece that is multi-color to show all layers OR as individual pieces that will need to be taped/glued together. This is the ideal situation because you can create separate layers so that you can pop up portions to have that layered effect or you can save the amount of paper you use by printing/cutting everything together as one diecut. And if you're anything like me---you'll really appreciate the ability to print out those tiny layers (like eyes or stripes) as a part of the whole shape instead of having to glue them onto your image later.
10. Are there any downfalls to this amazing new machine?
A. The only issue that I have found thus far is that each image that is cut out has a thin border around the outside edge. It's nothing that is really noticeable, but can be annoying. (see the brown border on the pic below)
Perhaps one of the best features of the new Imagine is that the display shows you the shapes/designs how they will look in color. One of the biggest complaints I've heard with the Gypsy or Design Studio is how difficult it is to see the details for each of the layers. While the size of the screen is comparible to that of the Gypsy---it is MUCH easier to see the detail of each image since they are in color.
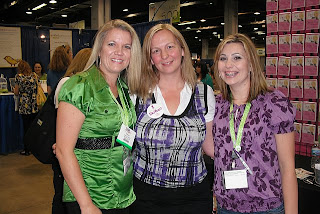
Here's a pic of me with My Pink Stamper, Robyn and her BFF from Karlee Krafts, Karlee!
Subscribe to:
Comments (Atom)


