Friday, February 25, 2011

That's What Little Boys Are Made Of

There are few scrapbook pages I love more than those done with my son's pictures when he was a teeny baby.  In some ways it feels as though that time was decades ago.......and at many other times it feels as though it was just yesterday.  These particular pictures are some of my favorites because they include both of the handsome men in my life.

Frog:  Sweethearts
Snail:  Walk In My Garden
Puppy:  Doodlecharms


Friday, February 18, 2011

My First Banner in Honor of Spring

I'm willing to do just about anything to usher in spring at this point.  And now when it does finally arrive---it will feel welcome with this cute banner.

Umbrella and Boot - April Showers
Chick - Just Because Cards
Kite - Boys Will Be Boys
Bunny - Easter 2010
Daffodil and Sun - Walk In My Garden (sun is actually the sunflower cut with some trimming)


Tuesday, February 15, 2011

How do I love thee....let me count the ways...

As a tribute to The Simpsons I made this V-Day card for my DH.  We like to keep things lighthearted and playful for this holiday, so I decided to go the cute/cheesy route for his card.  The train was cut at 4" and is embossed with one of the art deco Cuttlebug folders.  Then the indentations were colored in with a marker to emphasize the design and make it pop.

Train-Boys Will Be Boys
Hearts-Walk In My Garden
Font-Pooh Font

Saturday, February 12, 2011

There's no time like spring......there's no time like spring.....

Everyone seems to be saying the same thing this time of year.  I am SOOOO over this weather!  Thankfully this weekend we're having a heat wave----and it's in the 30's now.  Of course two days ago the high was 5!!!!!  With that being said, I've been sadly yearning for those days of bonfires and grilling out.  Our grill is STILL covered in a foot of snow.  One day last week while I was letting the dogs out for their business I saw our grill and thought about what a cute card that would make to my family in IL.  So here it is.....a card full of springtime thoughts.  And of course I just had to submit it for the Pink Stamper's challenge of a project regarding spring/Valentine's day.

Keep warm everyone!!!!


Saturday, February 5, 2011

2011 Stylish Blogger Award

Yay----they like me....they really really like me!


Thank you so very much scrapperbecka and In Love with PAPER!! for giving me some love with this Stylish Blogger award.  I'd like to thank the academy....wait...wrong speech.

My duties to fulfill this role require that I:
1.  Thank the person/persons that shared this award with me and link it back to their blog/blogs.

2.  Share eight things about myself.

3.  Pass this award on to eight other bloggers that I have recently discovered.

4.  Leave a comment so that they can pass along the recognition!


Eight things you never knew about me:
1.  I hate the feel of cardboard on my fingertips.
2.  My favorite candy is peanut M&M's.
3.  In 2007 I stopped scrapbooking/cardmaking completely and didn't start back until I bought my Cricut in December 2009.
4.  My favorite smell/general flavor is vanilla.
5.  I designed my own walk in closet and had an entire bedroom transformed to be this closet.
6.  I can't stay in a bath longer than 5 or 10 minutes.
7.  I enjoy organizing my scrap room ALMOST as much as I love scrapping in it.
8.  Despite my super fun, zany, crafty side----in the "real world" I work in accounting.

Time to share the love!
1.  Missie at http://createdbymissie.blogspot.com/
2.  RockinRenee at http://icameisawicreated.blogspot.com/
3.  OkieLady at http://okieladybugsscrapnmore.blogspot.com/
4.  Chignon at http://chignons23things.blogspot.com/
5. Create Dream Imagine at http://jessicajmscreations.blogspot.com/
6.  Enfys at http://going-buggy.blogspot.com/
7. Kelli at http://www.beecraftee.com/
8.  Leanne at http://bankingoncrafts.blogspot.com/

Thursday, February 3, 2011

Back to the Basics

Sometimes in life you just need to go back to the basics.  That's what this week's Circle blog challenge is all about.  With all of the new shiny cartridges coming out, it's easy to let those original oldies but goodies get dusty.  This challenge forces the creative juices to start flowing by asking you to use fairly basic shapes in new and exciting ways.

I created this layout using only Accent Essentials and Plantin Schoolbook.

~Circles w/ flowers on the left side of the page is from Accent Essentials.  I cut welded two 3" circles with three 2" circles.  I then ran some sparkly ribbon across the top and placed a button in the middle of each circle.  The flower petals have been blinged up with stickles.
~The dark blue ornate square is from Plantin Schoolbook and was cut out at 5"x5".
~The light blue scalloped square layered on the ornate square is from Accent Essentials at 5.15"x5.15".
~The phrase "Outstanding Student" was cut from Plantin Schoolbook as well.
~Finally we have the scallops around the title of the page.  Each of those were cut from Accent Essentials.

Wednesday, February 2, 2011

I Do....You Do.... We All Scream For Yudu!


I was very excited when the Yudu Cardshop aired on HSN.  It was a matter of minutes before deciding to add it to my crafting tool collection.  As soon as it arrived I got to work experimenting with my new toy.  This was a complete departure from my experience with the regular Yudu.  That particular machine sat untouched in the box for months and months before I ever got the courage to try it out.  And even after having it for a solid 6-7 months, I've only used it to make two t-shirts.  Thank goodness I used my Cricut reward points to pay for it.  The Yudu Cardshop seems much less intimidating to me.  Perhaps it's because I know there are premade screens to make things easier.  This card was made using the birdcage screen that came with the machine.  And of course it's dolled up with stickles and a couple of irock gems.

After mastering the use of the preprinted screen, I decided to give it a go with the blank screen and some adhesive vinyl.  I've included some pics to help you with this process.

Here's the finished product!


STEP #1 - Cut the image you like on adhesive vinyl.  If you're doing a word or design that is not symmetrical, you'll have to cut it in the flip mode.  Just enter your word/design on the Cricut keypad and hit the "flip" button before cutting.  The settings I use for vinyl are Blade: 5, Pressure 3/Medium, Speed 3/Medium.
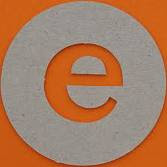
STEP #2 - Gently pull the entire cut from the Cricut mat making sure that nothing sticks to the mat.  Once the entire image has been removed, carefully use a sharp pointed tool to remove the parts of your image where you want ink to go.  For example, if you're wanting to use a lowercase e, you'd remove the parts showing in grey below, but leave the areas shown in orange.
STEP #3 - Place transfer tape/scotch tape to the top of your cut, making sure to cover the entire image.  Now peel off the backing to your vinyl to reveal the sticky side and adhere to the "silver" side of your blank Yudu screen.  Tape around the edges so the ink won't be able to pass through to your card.

One tip is to turn the screen over and use the small squegee to press out any bubbles and to make sure that the vinyl is completely adhered to the screen.


STEP #4 - Place cardstock on the base of Yudu Cardshop, and place screen directly on top.  Squeeze a fairly thick line of ink across the top and middle of your image.  Then lightly pull the squegee across your image to ensure that ink is covering all necessary areas.  This shouldn't affect your cardstock b/c the screen actually sits above it until you press down firmly with the squegee.  Once all areas are covered in ink (remember to work quickly with this part so the ink doesn't dry), use both hands to push firmly down on screen and pull toward yourself in a smooth motion.


STEP #5 - Quickly remove screen and take to sink to be rinsed out.  I also take my bottle of ink and squegee at this time.  I toss my screen into the sink with water running on it.  I then remove the cap to the ink bottle and scrape any excess on the squegee into the bottle and replace the cap.  Then I toss the squegee into the sink and start truly rinsing the screen out.  I have only had to run my fingers along the screen surface (both top and bottom) in order to get all of the ink off.  I then rinse off the squegee and ink bottle.

I then repeat steps number 1 thru 5 for the second layer of my design.  The most challenging part of layering the two images was getting the second image to line up appropriately over the first image that was printed.